Today I’ll share the very first configuration steps I usually take when I get my hands on a brand new raspberry pi.
I assume that:
- Raspbian is freshly installed.
- The raspberry pi is up and running.
- You know its IP address.
- You know how to connect to the pi over ssh.
Security 101: The Basics
Change The pi User Password
With a standard raspbian installation, you can log in as the user pi with the password raspberry. It’s raspbian’s default, everybody knows that ! So start by changing the pi account password:
$ [sudo] passwd [{username}]The elements in brackets [] are optional. The curly braces {} mean you need to enter something appropriate (i.e. a username in this case). When used standalone, passwd changes the current user password. sudo and a username are only necessary to change someone else’s password.
Update The System
Next, your system is only secure if you keep it up to date:
$ sudo apt-get update
$ sudo apt-get upgrade
$ sudo apt-get dist-upgrade
$ sudo shutdown -r
When the system is back up, I suggest to clean up a bit:
$ sudo apt clean
$ sudo autoremove
Whether or not to use dist-upgrade is up to you. upgrade is conservative with regards to dependencies (thus safer). Some packages and programs may be kept back as their newer version relies on new dependencies. That’s where dist-upgrade comes into play.
apt clean deletes the files downloaded in /var/cache/apt/archives (useless once installed) thus frees up some space.
Did you notice that, even though you entered commands with sudo, the system didn’t ask for a password? That’s a specific (and dangerous though easier) behavior for the pi user we’ll change later on.
Create A New User
You may wonder: “what’s the point”?
The underlying idea is similar to the password issue I mentioned earlier. Everybody knows raspbian defines a pi user by default. Thus you’d better use another one. One only you know the username.
$ sudo adduser {username}
$ sudo usermod -a -G sudo {username}
When adding a new user the system asks for a password.
The 2nd line adds the new user to the sudoers group. Only the users in that group can issue commands preceded with sudo.
Now is the time for you to log out of the pi account and log in with your new account. Get used to it and part ways with pi.
Dealing With The pi User
Delete pi
This is for the bold, the daredevils:
$ sudo deluser [--remove-home] pi
I suppose this is self explanatory enough. The optional argument also deletes the pi user home directory (/home/pi) including everything it contains.
Hang on … what’s the problem, why is this for the bold?
The trick is some aspects of the raspbian distribution still rely on the pi account. Removing pi might have some side effects, but it’s not entirely clear which and where.
Long story short, deleting pi is up to you.
Make pi Ask For A Password With sudo
As we saw when upgrading the system, pi can issue sudo commands no question asked. If you don’t dare getting rid of the pi account, at least restrict its potential for harm.
We could do this a couple ways. The easiest option consists in deleting one file. This file overrides the default security strategy, by granting pi the extra power of sudoing without entering a password:
$ cd /etc/sudoers.d/
$ ls -l
$ sudo cat 010_pi-nopasswd
pi ALL=(ALL) NOPASSWD: ALL
$ sudo rm /etc/sudoers.d/010_pi-nopasswd
Then, if you want to go even one step further, it’s possible to stop pi from using sudo, period:
$ grep sudo /etc/group
$ sudo deluser pi sudo
$ grep sudo /etc/group
Use A Firewall
Raspbian is based on debian and yes GNU/Linux is generally safer than Windows or even MacOS operating systems. Still, you should protect your computer from undesired outside access:
$ sudo apt-get install ufwThe Uncomplicated FireWall (UFW) is super simple to use compared to setting up your iptables. It’s disabled by default which is fortunate as we must add at least one rule first.
Most of my pies are “headless”. They don’t have a keyboard or monitor. I only access them remotely on the command line through ssh. Thus I must make sure that ssh will still be authorized after enabling the firewall.
$ sudo ufw limit in 22/tcp22 and tcp are respectively the standard port and protocol for ssh. Make sure you enter the correct port number for your installation.
Also I use limit in instead of allow in for additional security against brute force attacks. Then ssh keeps track of unsuccessful connection attempts and forbids offending IP addresses for a while after too many tries. This makes the job of automated password guessing tools much more difficult especially with a strong password.
If you fail to configure the firewall properly, you may lock yourself out of your raspberry pi for good (at least remotely in ssh). Thus take your time and think twice before proceeding with the next command:
$ sudo ufw enable
$ sudo ufw status verbose
Other Configurations
DNS Resolution
It happens I’m a crazy nerd. I run my own private DNS at home so I can name the various equipments connected to my local network.
Basically I need my private DNS to be queried first for names known only locally before delegating the domain name resolution to my ISP or a public DNS.
In order to do just that edit the /etc/resolvconf.conf file:
$ sudo vi /etc/resolvconf.confand replace the line:
#name_servers=127.0.0.1with:
name_servers={your private DNS IP address}Then restart so the new DNS configuration is taken into account:
$ sudo shutdown -r
$ cat /etc/resolv.conf
Be mindful as /etc/resolvconf.conf and /etc/resolv.conf are unfortunately very similar names for 2 different configuration files !
Time Synchronization
Time synchronization relies on the NTP protocol (Network Time Protocol). Obviously it keeps the pi clock right on time. This is necessary if, for instance, your pi uses or proposes some sort of time based 2 factor authentication mechanism.
If you search the web, you’ll find most people install the ntp and ntpdate packages. However this isn’t necessary, unless you want your pi to act as a NTP server.
If you just need a NTP client for your pi to set its clock properly, there is a simpler way that doesn’t require any additional package installation.
$ sudo vi /etc/systemd/timesyncd.confThen change the line:
#NTP=for:
NTP={space separated list of NTP server IP addresses}Now let’s check everything is correctly setup:
$ timedatectlIf the line NTP synchronized: indicates no try:
$ sudo timedatectl set-ntp true
$ sudo systemctl status systemd-timesyncd.service
log2ram
The trick with raspberry pies is they are often running 24/7. They don’t have a hard disk. A micro SD is the HDD. Constantly writing to a SD card reduces its lifespan. And, there is one thing that is written to the card at all times: it’s the logs.
log2ram is a program shadowing /var/log in memory so that log updates are written to memory instead of disk. Log files are synchronized back to disk only once a day.
I’m usually very cautious with installing programs of unknown origin, but in this case it’s a short shell program, that’s mostly self explanatory.
Long story short, I’ve read the whole thing, it’s nice and safe.
$ cd /opt
$ apt list git
$ sudo apt-get install git
$ sudo git clone https://github.com/azlux/log2ram.git
$ cd log2ram
$ sudo chmod 744 install.sh
$ sudo ./install.sh
raspi-config
Last but not least I run the famous raspi-config program.
$ sudo raspi-config
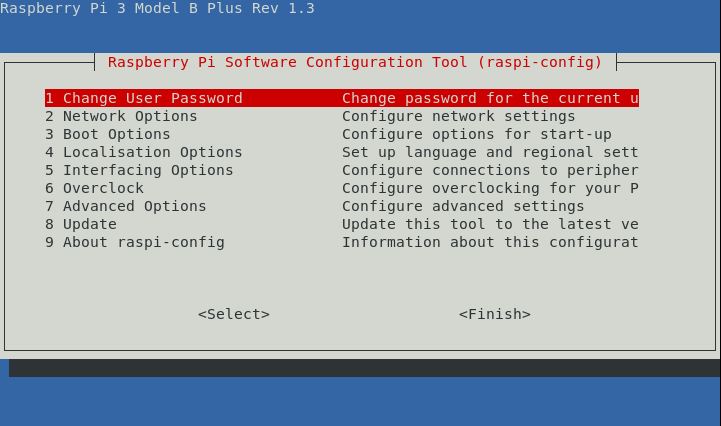
The sections I’m usually going through are:
Network Options > N1 hostname: to replace the defaultraspberrypihostname with something more meaningful in relation with the raspberry pi usage.Boot Options > B1 Desktop / CLI > B1 Console: to confirm I want to launch the command line interface on startup (instead of a Graphical User Interface).Localisation Options > I1 Change Locale: there I usually select at leasten_GB.UTF8(the raspberry pi is made in UK after all) as well asen_US.UTF8.Localisation Options > I2 Change Timezone: this one should be rather obvious.Advanced Options > A3 Memory Split: if I target to use the raspberry pi only in “headless” mode (typically as a server) and not as a desktop running a GUI, I set the value to the minimum (i.e. 16) to avoid wasting memory on a GPU I won’t need.Advanced Options > A1 Expand Filesystem: to use the SD card to its full extent.
After all this, I’m just a couple commands away from finishing my standard “new raspberry pi routine”:
$ cd
$ sudo apt clean
$ sudo shutdown -r
$ cat /dev/null > .bash_history && history -c && exit
Final Words
I hope you enjoyed reading this post. And I definitely hope you’ve learned something or at least found it useful. I’d be very interested in constructive feedback. Have I missed anything, have you spotted any errors?
Do you have recipes on your own you’d be willing to share ? Anything in particular you perform systematically with each new raspberry pi?
In later posts I shall dwell some more on the security side of things and discuss ssh access in details.
Additional sources of information: Securing your raspberry pi
Leave a Reply